Would you like to learn how to sew straight lines with your sewing machine? When you have nice stitches, your projects will look more professional.
You might be starting out or just wanting to improve. With time and practice of the right techniques, you can get better.
Learn about the methods I like to teach. I’ll tell you the materials you’ll need, step-by-step instructions, and share my photos.
Materials
Here are the things you’ll need, and I’ll explain more about the fabric.
- Sewing machine
- Fabric
- Colored tape
- Ruler
- Pen, marker, or pencil
- Basic sewing supplies
Notes on Choosing Fabric

Disclaimer: This post may contain affiliate links. As an Amazon Associate, I earn from qualifying purchases.
You’ll want to use fabric that won’t pull or drape on the sewing machine. Ideally, I like to use a cotton woven fabric with no elastane. Make sure it’s not stretchy or knit.
Quilting cotton, or broadcloth, is a good medium-weight fabric with structure. Old bedsheets or a good muslin will work fine.
You don’t want to use fabric that’s too light (voile) or heavy (denim) to start out with.
Preparing the Fabric
1. Before starting each method, you’ll want to press the wrinkles out.

2. Cut your fabric into a large piece, preferably in a square or rectangle. I cut rectangles about 8 by 16 inches, and they don’t have to be perfect.

3. You can make the fabric thicker by doubling it. Fold it over into a square.

4. I recommend using the iron to press on the fold. This helps keep it nice and neat.
Sewing Machine Settings
These are the settings I used and would recommend.
- Speed: Slow
- Stitch type: straight
- Stitch length: 2.5 – 3.0
- Tension: 4 – 5
How to Sew Straight Stitches on the Sewing Machine
These are techniques to help you build up your skills, without relying on a magnetic seam guide. I can’t speak on this as I’ve never used one.
At this point, you should already know how to operate your sewing machine. I used a contrasting thread so you can see it better.
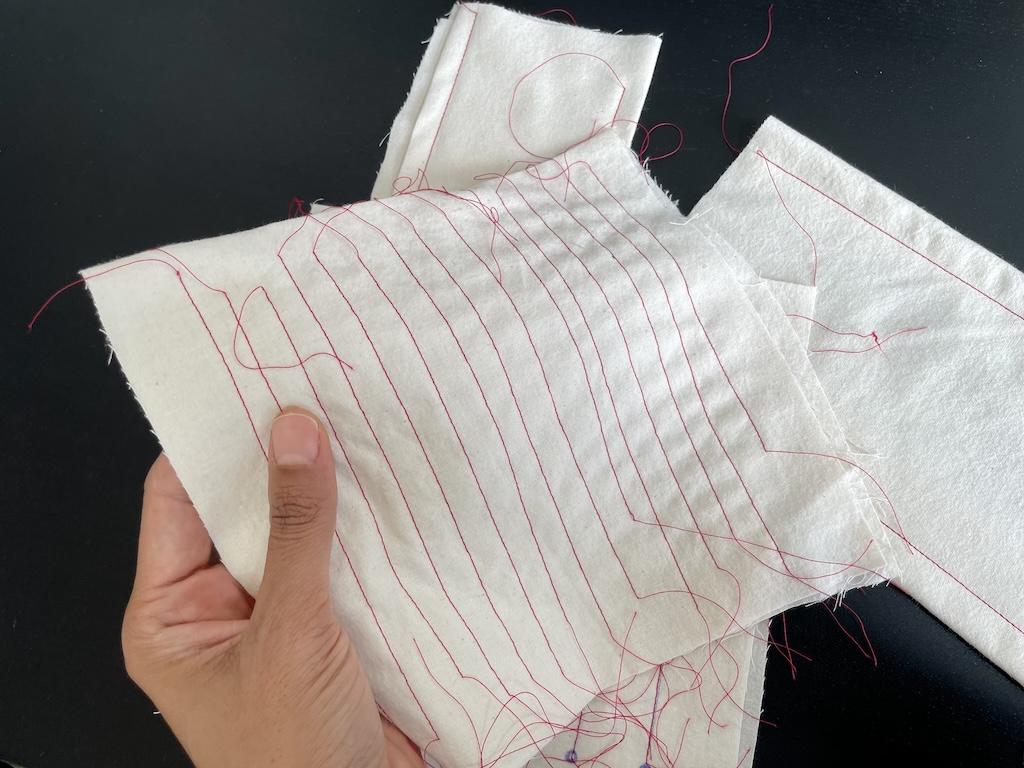
I. Just Run Stitches

If you’re new to sewing, get the feel of running stitches. Before you can sew straight lines, you just need to sew lines.
The point of this exercise is to get used to your machine and guiding the fabric. Don’t worry if your stitches aren’t straight.
1. Start from the top of the fabric and run stitches down lengthwise.

2. Use your pedal to control how fast you stitch. It’s okay to go really slow.
3. Use both hands to guide the fabric as you sew, but don’t pull it. You might only see one of my hands when taking pictures, but trust me, I always use both.

4. When you finish sewing one line, make more. I have several lines.
II. Down the Road: Dot to Dot
Once you have gotten used to running stitches with your machine, you’ll want to learn to look down the road. Just like when people drive, they need to look where they’re heading and not just at the steering wheel.
So, you’ll want to train yourself to look where you’re going, notice the needle, and guide the fabric. It’s much easier to guide the fabric when you’re looking towards your destination.
1. You’ll prep another fabric square.

2. Use your fabric pen and draw dots on the top of your fabric and space them 1 inch apart.

3. Draw dots on the bottom 1 inch apart. Try to line them up with the top dots. I used the grid on my cutting mat to help with this.

4. Use a ruler or straight edge to draw a line to connect the top dots to the bottom ones.

5. Now you’ll stitch and try to stay on that line from the top dot to the bottom.

6. Do this as many times as you need. If you can’t stay on the line at first, it’s okay. Train yourself to look down the line and at the other dot coming up, rather than staring at the needle.

You might need to practice this for several days.
Be sure to check to see how close you are to the line. If you’re right on, it’s time to move on to the next method!
III. Using the Throat Plate: Seam Allowance

Okay, most likely when you sew, you’re going to use the throat plate or needle plate as a guide. It’s the plate under your needle.
You’ll find markings etched in this plate. As you sew your seams, you’ll line up the ends with the markings.
On sewing patterns, they’ll refer to this as a seam allowance. Let’s use 5/8-inch (0.625-inch) seam allowance for this one.
This is the amount that you are going to leave from your stitch line to the fabric edge. This is very important to know.

1. Take some tape and extend the line on your sewing plate. This will give you a longer line to work with.
2. You’ll want to prep another fabric square. Make sure the ends are straight. You can also use the folded side and press.

3. Now, we’ll stitch along the seam allowance by keeping the edge of the fabric lined up to the tape.
4. Use your hands to guide the fabric as you stitch. This is how you’ll keep the fabric lined up.

That’s why that dot-to-dot exercise was important. See how you need to look at the needle, throat plate, and down the road on the seam allowance?
After you finish one line, you can flip the fabric on another edge and practice more. Be sure to check your lines when finished.
IV. Using a Foot Attachment

A foot attachment might help you sew a straight line. You can get a walking foot or quilting foot with an adjustable guide.
I have a seam guide foot that I can use to show you, but it’s not adjustable. The guide is off to the side, and can be used for joining seams and sewing hems.
1. Prepare another fabric square.
2. Attach your foot attachment. Adjust it to the seam allowance if necessary.

3. Line up the edge of the fabric with the foot.
4. Run your stitches while keeping the fabric touching the guide. You’ll see that you need to guide it less, because it keeps the fabric in place more easily.
Note, although this is a great solution, your fabric can still move around with any guide. So, it’s not foolproof.
But, working on your skills to look at the seam allowance, down the road, and guiding the fabric will greatly increase your ability to sew straight lines.
Additional Notes

Make sure your needle is sharp and straight. Also, I like to use quality threads, as cheaper ones shred up in my sewing machine.
It’s okay to go really slow at first, so press the pedal lightly if you need. I remember when I first learned as a child, and I was so nervous!
The main reason people can’t sew straight is that they are watching the needle too much. While you do need to look at it, train yourself to look down the road.
You’ll also want to pay attention to the seam edges and allowance while guiding the fabric. You might need to practice one method for many days.
Choose easy projects with straight lines, like pillows and cosmetic cases. This will give you a sense of accomplishment and boost your confidence!
Final Thoughts
Nice straight stitches will make your projects look polished, so this is a great skill to work on. Just remember, it takes time and practice.
Today, I don’t have to think about where to look when sewing. After a while, it becomes second nature, so don’t give up!
More About Sewing
I have many other related posts on my blog. You might want to check them out.
- Would you like to learn about places where you can learn to sew?
- You’ll want to read my fashion sewing tips if you like to make clothes.
- If you want to start using tissue paper patterns, I’ll show you how to cut them.
I’d love to hear all about your sewing journey!
Originally published: July 23, 2025