Disclaimer: This post may contain affiliate links. As an Amazon Associate, I earn from qualifying purchases.
I made a cute DIY workwear jacket with big arm patches. It’s oversized, and was much bigger than I thought.
I actually had to take it down a notch, literally. But that was after sewing and realizing it was the wrong size!
I’ll tell you all about the fabric, notions, my process, and share photos. You might want to make one too!
Simplicity S9239 Jacket Pattern

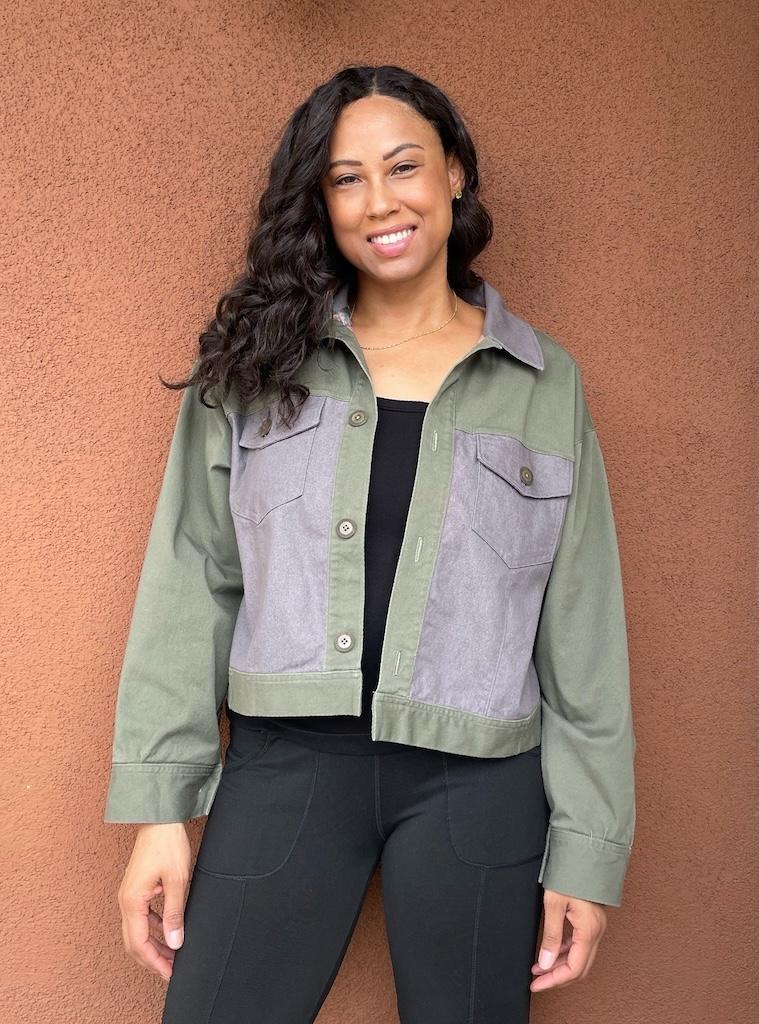
I liked the way the model wore this jacket in the picture, and that’s why I bought Simplicity S9239. Style-wise, it’s pretty cool.
It’s unstructured and unlined, with a boxy fit. The back has an inverted box pleat, which gives it some room.
You’ll have a couple of options for this jacket, and I made variation B. This is hip length on me.
The one I like most is the flared sleeves with patches and button cuff. You can also make them straight without the cuff.
Along with the collar variations, you can change up the pockets and length.
Overall, I’d rate this pattern at an intermediate level. It’s not very detailed, but you’ll need to sew on sleeves, a collar, and buttons.
Materials
Here’s everything I used for this project. I spent so much time digging through my button collection!
Fabric

The first time I made this jacket, I used a light purple linen blend from Joann. I just love this color and it speaks of springtime.
But it’s the perfect weight and type for warm weather seasons.
Now the spice-colored fabric is heavier. It’s a stretch cotton sateen from Joann as well.
Now, this one has such a soft hand, and the color is beautiful. This one is perfect for fall, and I finished it just in time for the cooler days ahead.
Suggested fabrics include broadcloth, canvas, chambray, chino, corduroy, cotton types, denim, linen types, pique, satin, stretch wovens, twill, and wool types.
Notions

Depending on the style you make, you’ll need seven or eight 7/8 inch (0.875-inch) buttons. The ones I used were actually bigger.
I also used medium-weight fusible interfacing on the collar, cuffs, and front facing.
Needle
I used a size 90/14 needle for the linen, and also for the other fabric. It worked just fine, but I could have gone with a microtex needle for the stretch fabric.
Thread
I used matching Gutermann universal thread in my sewing machine, which is made of 100% polyester.
For the serging, I used Maxi-Lock spun thread. It’s made of polyester too.
Sewing My Jacket
The directions for this jacket were straightforward and pretty easy to follow. The collar and cuffs might be the most challenging parts.
Prepping

I washed the fabric as usual and then cut it. I treated my linen version as my mockup.
Well, I made it medium, and my size fluctuates with commercial patterns depending on the amount of ease. Now, what I didn’t realize is how oversized this garment was.

Even at a size small, the midsection is very generous. If it weren’t for the arm holes, I could have probably gone down to an extra small.
On the envelope that says you can use linen types, but I like this jacket with more structure.
The linen doesn’t hold the shape, so I won’t use it again. It came out looking like a shirt, which isn’t bad, but it didn’t remind me of a work jacket.

Plus, you can’t really see the volume in the sleeves, and I might as well have made them straight.
After doing all that work, it was some time later that I sewed my rust-colored version. Well, I forgot to write down notes about the fit.
So, I cut a medium again and didn’t even think about the sizing until much later!
Construction

Everything was flowing well when I started my second jacket. Boy, was I in for a surprise.
I made the front pieces, sewed the pockets, and then made the back. I attached the yoke and then the front and back at the shoulders.
By this time, I was thinking, this is looking a bit big. After sewing the side seams, I knew it was the wrong size.

So I tried it on, and then put it on the dress form. I mean, this thing needed to be taken in almost 2 inches on both sides!
After that, this jacket ended up in my UFO pile for a long time. I felt defeated and didn’t want to deal with it.
And then I figured it out. Many times, I just mark my size on the back of the sewing pattern envelope.

Well apparently, I must have marked medium last time, and forgot to change it.
I had already sewn so much of this thing and was so unmotivated to finish it. So, I tucked it away for a couple months.
Then one day, I pulled it back out of the bag and deconstructed it. After seam ripping, I recut the smaller size.

Then I resewed the pieces and went on to finally finish it. I attached the neckband and collar, front facing, and side pockets. After that, I put on the arm patches, sleeves, and cuffs.
Then I ran out of thread, and this was annoying!
I used to run to Joann for this, but they’re long gone. So, I went to the fashion district and luckily found my exact color. Whew!

If that wasn’t enough, I have one last blip for you. When I was attaching the front buttons, I realized one side was longer than the other side.
Everything that could possibly go wrong with this project happened. Is there an award for this?

But, compared to the whole sizing thing, this was an easy fix.
All I had to do was deconstruct the hem and even out that side to match the other. Then I re-adjusted the seam and sewed it.
Finally, I attached the buttons, and voila! All done!
Adjustments

On my purple jacket, I ended up taking out the box pleat in the back later. I was trying to size it down and didn’t need all that extra room.
Also, you can either do the front patch pockets or the inseam ones. Well, I did both on the rust jacket just for kicks.

But if you do them, make sure your jacket is long enough. You don’t want pockets showing through the bottom.
I also tacked them in place from the inside so they wouldn’t be flopping around.
Finishing Details

With the linen jacket, I made belt loops and a tie belt because I thought this would help give it a little shape. I got the idea from looking at pictures online.
It did bring in the waist a little bit, but this is just the style of the jacket, so it is what it is. It’s oversized and looks even bigger in linen.
I finished my rust color jacket with a single or double topstitch wherever I could. This really helps hold the seams in place. They don’t tell you to do this in the directions, but I do it anyway.
Project Notes

For this pattern, you may need to go down a size or two. I measured around the chest of my finished jacket, and it’s bigger than what’s stated on the back of the sewing pattern envelope.
And I used stretch woven fabric, but it doesn’t do much to change the sizing.
Oh yeah, and my garment went unfinished for so long that it took a while to wash out all the water-soluble ink.
There are some places where I can still see a little bit. Oh well.
Final Thoughts

Overall, I think my jacket came out cute. The style would go well with a mini skirt or even shorts.
I made so many mistakes, and this whole process just caused so many headaches. But I ended up with a lovely garment that I can finally wear.
More Sewing Projects
I have many other related posts on my blog. You might want to check them out.
- I think a cute denim mini skirt would look nice with this jacket.
- My denim jacket is made of similar stretch cotton in gray.
- I made a shirt jacket and color-blocked it for a unique style.
- If you’re thinking of making some coats and jackets, you’ll want to see my outerwear tips.
I’d love to hear all about your sewing journey!
Originally published: December 10, 2025