Disclaimer: This post may contain affiliate links. As an Amazon Associate, I earn from qualifying purchases.
If you’re beginning to sew, you may be shopping for new tissue paper patterns. You might be wondering how to cut them out.
I remember the feeling when I used my first sewing pattern as a kid. It was confusing, and I have no idea what to do.
So I’ll show how to do it step-by-step. That way, you’ll be able to finally use them.
Materials

These are the things you’ll need.
- Uncut tissue paper pattern
- Scissors
- Highlighter
- Rotary cutter & mat (optional)
- Iron & Ironing board
How to Cut Out Tissue Paper Patterns

I recommend working slowly until you get the hang of handling tissue paper. They can rip easily.
Once you get the hang of it, you can get speedy like me!
1. Check your size.

First, make sure you have the correct size. Look at the size chart on the envelope back and determine your size based on bust, waist, and hip measurements.
Before you cut into the tissue, recheck. I’m known for grabbing the wrong size in a rush. Ugh!
Most fabric stores will only accept returns on new, uncut sewing patterns. And some take no returns at all.
2. Spread out the papers.

Take your brand-new pattern out of the envelope. It should be folded up nicely from the factory.
Unfold the papers, spreading out the tissue paper as best you can without ripping it.
I unfold mine on the floor or my cutting table. You’ll need a large flat area for this.
Depending on how many pieces come with the pattern, you’ll probably have one or several pages of large sheets of tissue paper.
3. Cut around the pattern pieces.
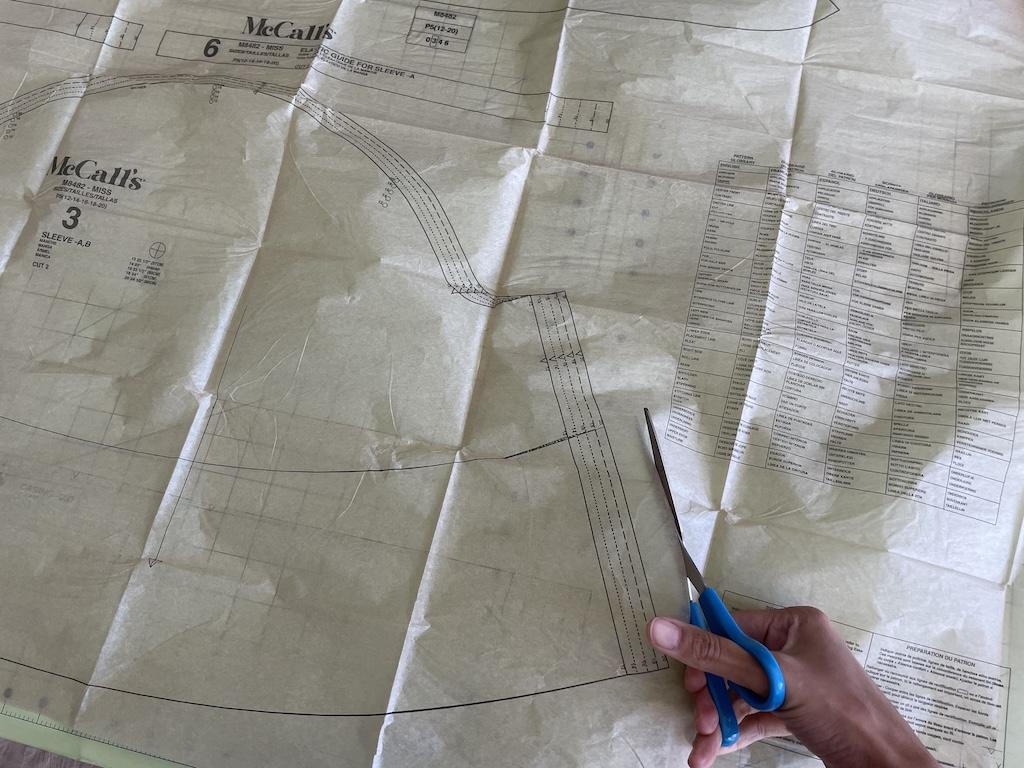
From this point, I like to cut out big pieces of the pattern. Cut out pieces that you can manage.
You can use scissors or a rotary cutter.
If you use a rotary cutter, you’ll need a cutting mat. I explain more about the rotary cutter in step 6.
Be careful not to cut through any of the pattern pieces.
I cut around them to straighten them out better. And they are easier to straighten out once they are smaller pieces.
Don’t worry about cutting on the lines yet.
4. Iron the pieces.

After I have my smaller pieces, I go to the ironing board. Then I iron the pieces so they’ll be nice and flat.
I use a warm setting without steam, and it gets the wrinkles out. You don’t need to use a high temperature.
5. Highlight your size (optional).

After ironing those pieces, I highlight the size I want to cut out. This helps me see which line to stay on.
You’ll see that many of the cutting lines may look similar and run close together. Highlighting my size helps me stay on track, so I cut on the right line.
Trust me, I’ve cut on the wrong line before!
Just don’t press down too hard or be too abrasive. A simple broad-tip highlighter works for me.
I also put scrap paper underneath, as the marker can bleed through. That way, you won’t get highlighter all over your table.
And, of course, if highlighting isn’t for you, then skip it.
6. Decide if you’ll need many sizes.

Now, I cut out my exact size for most of my patterns. And if you choose to do this, you’ll cut on the outside of that (highlighted) line.
But wait… Do you plan to make this pattern in different sizes? Then, you’ll want to keep all the sizes in the pattern.
I do this for some sewing patterns.
For example, I have a multi-size unisex tracksuit pattern. I kept all the sizes because I often make clothes from this pattern for other people.
So, I cut around the largest size in the pattern. That way, I’ll have all the sizes I need.

And when cutting my fabric, I trace the pattern size needed. I either do this on tracing paper or directly on the fabric.
Hey now… after sewing for many years, I’ve got it down!
You might also save many sizes if you fluctuate between sizes or need to grade.
For example, let’s look at making a dress with a size 14 bust and 16 hips. I’d cut around the size 16 because I know I’ll make adjustments and grade later.
(Skip step 7 if you’ve decided to keep all the sizes in step 6.)
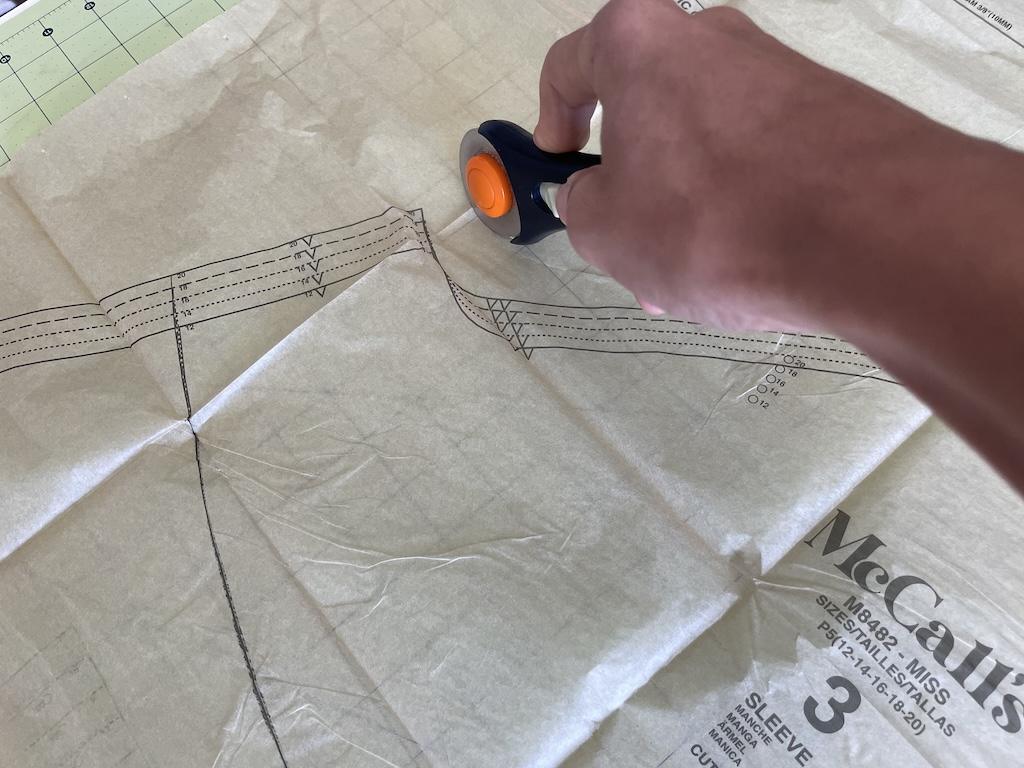
7. Cut out the pieces.

Now, you’ll cut your pieces with a rotary cutter or scissors.
I like cutting my pattern pieces with the rotary cutter because it’s faster. So, I save the blades I cut paper with in one little box.
I don’t mix these blades with the ones I use to cut fabric. Some people have two rotary cutters, one for paper and one for fabric.
I used one rotary cutter and swap my blades out. (I store my paper-cutting blades in a little box.)
If you use a rotary cutter, place the tissue pattern on the cutting mat. Roll the cutter to cut outside the pattern size line.
Like cutting pizza… But, don’t press down hard because it’s not pizza dough—tissue cuts easily.
If you use scissors, you will just cut outside the line of each pattern piece until you finish.
8. Use your pattern pieces.

Now the pattern pieces are ready to use. We can lay them on fabric and cut!
Project Notes
When done, you can fold up your pattern pieces and store them in the envelope they came in.
Pull them out of the envelope when you need to use them again. Straighten them out by ironing them on low heat.
They fold up easily and are very lightweight. That said, they can rip easily too. You can use clear tape to fix them.
Some people sell used, cut patterns online. If you find your size, most of the work has been done for you!
Final Thoughts
Learning how to cut out tissue paper patterns may seem tricky at first. My mom showed me how to do this long ago when I was a child.
Once you cut a few, you’ll get the hang of it. Then you’ll be able to make countless clothes to fill your wardrobe!
More About Sewing
I have more related post on my blog. You might want to check them out.
- If you plan to buy PDF patterns, I’ll show you how to cut them too.
- What are some beginner sewing tools to have in your kit?
- Would you like to know where you can learn to sew, including places you might not think to look?
I’d love to hear about your sewing adventures!
Originally published: February 3, 2025