Disclaimer: This post may contain affiliate links. As an Amazon Associate, I earn from qualifying purchases.
Would you like a simple way to change up the look of a pull-on shorts pattern? You can make easy ruffle waist shorts.
This can work with many sewing patterns with elastic waistbands. It adds a cute little spin to them!
I’ll show you the pattern I used, materials, and my step-by-step process. You might end up changing the look of your shorts too.
Materials
These are the things you’ll need. Also, you’ll want to use the suggested fabrics and notions on the pattern that you choose.
- Shorts pattern
- Fabric
- Elastic
- Bodkin
- Basic sewing supplies: needles, thread, pins, scissors, iron, etc.
Notes on Choosing a Shorts Pattern

I used Simplicity S1165 sewing pattern for my hack, but any with an elastic waistband will do. This is one of my favorites.
It has front scoop pockets with a facing and back patch pockets. You also have the option to make pants, and this hack would work for them too.
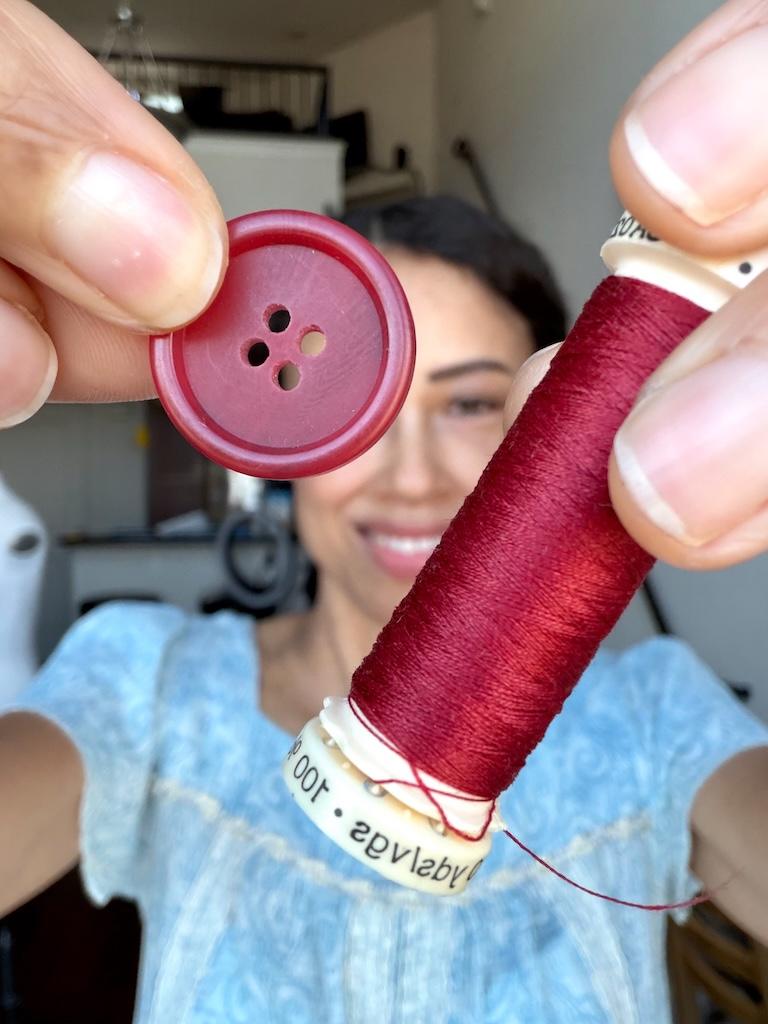
Notes on Choosing Elastic

You’ll need elastic to go around the waist, and there are many different types. Make sure it’s comfy, and I made a post about the best ones to use.
For these shorts, I used 1-inch knit elastic, and it’s perfect for the fabric and hold.
I also used a bodkin to pull my elastic through the casing. Fabric stores sell other tools too. You can always use a safety pin.
How to Make a Ruffle Waist Shorts Hack

I’m focusing on only the waistband part in this tutorial. I did other modifications so they’d fit better, which I described in another post.
This is fairly easy, so a beginner could tackle it. Note that I used a 5/8 inch (0.625-inch) seam allowance.
1. Sew the front and back pieces.
I followed the pattern directions to make the shorts, except for the waistband. You’ll follow my directions for that.
On mine, I made the pockets. Then I sewed the front and back of the shorts.
2. Add width to the waistband.

Before cutting the waistband, you’ll want to add some extra width. I added an extra inch by marking it on one side of the fabric.
I knew folding this casing in half lengthwise would give me an extra 1/2 inch (0.5 inch) on both sides. If you want your waist to be wider, add more.
Mine looks more like a ruffle, which is what I wanted with these shorts. If you want a standard paper bag waist, add anywhere from 2 to 3 inches in width.
I didn’t want too much fabric around the waist for my shorts, but you might want more.
Now you can go ahead and cut your waistband.
3. Make the casing.

Follow the sewing pattern directions to make the casing and sew it to the shorts. Remember to leave an opening in the back to insert the elastic.
Your opening needs to be slightly bigger than the width of your elastic.
4. Choose your elastic.

You’ll probably want to stick with the elastic width the sewing pattern suggests. I used 1-inch knit elastic because it is comfortable and holds well around my waist.
5. Mark your stitching line.

Now, mark the line where you’ll stitch for the casing. I don’t use the sewing guides on my sewing machine for this.
This method is more accurate for me.
I used a disappearing ink fabric marker to mark off 1¼ inches for my casing seam. Don’t use permanent ink.
You want the elastic to have space to move in the casing. If it’s too tight, it’ll bunch up.

I made my opening for the casing too big, and I don’t know how this happened. So, pardon me while I stitch it up some… Ha ha!
6. Sew on the line.

After marking all the way around your casing, you’ll sew a straight stitch on that line.
7. Add your elastic.
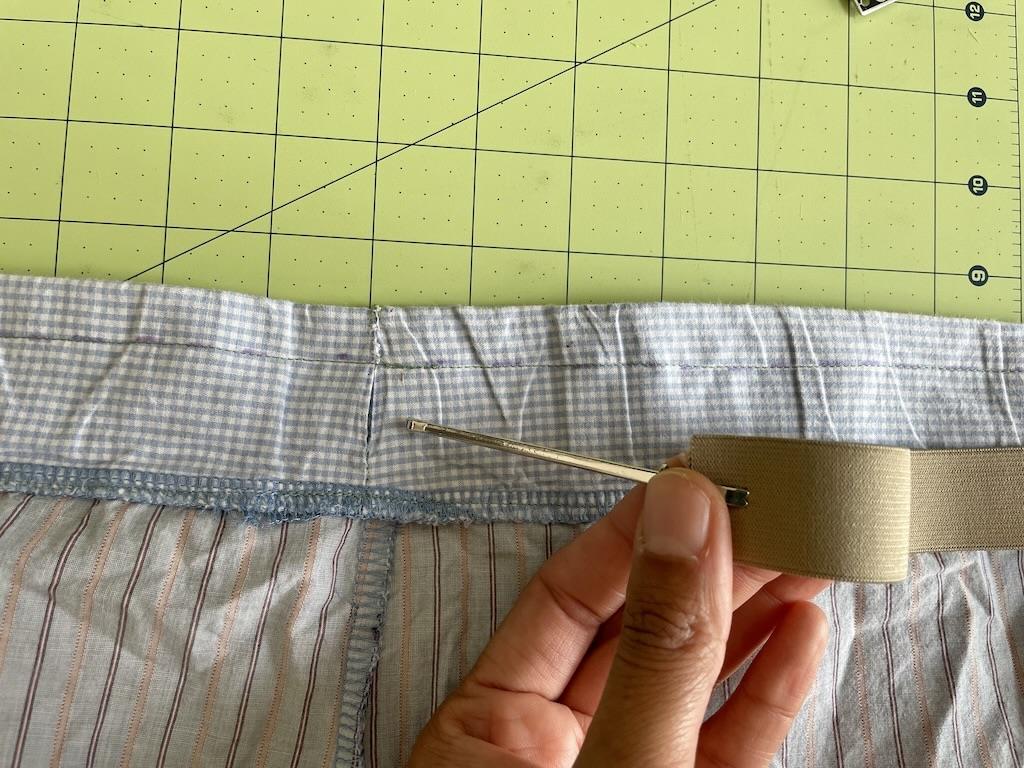
Now you can add your elastic. I used my bodkin to pull my elastic through the casing.
Then I adjusted the fit and secured it by sewing a zig-zag. If you don’t know how to do this, you can follow my tutorial.
8. Sew up the opening.

After you have secured the elastic, you can sew up the opening. I hand-sewed using a whip stitch.
Voila! You’ve hacked an easy shorts pattern to make shorts with a cute ruffle waist.
Project Notes

My shorts typically fit on my low waist. If you want yours to fit high like paper bag shorts usually do, you’ll have to adjust the crotch length.
It’s important to try the shorts on and adjust the elastic when you fit them. Even if I compare the waist to my other shorts, I still try on each pair.

Note that always lengthen the back crotch of my shorts and pants by about 1-1/2 inches (1.5 inches). This makes a big difference in the fit.
You’ll want to make a mockup in case you need to adjust them, especially on the hips or crotch.
Final Thoughts

Now that you know how to hack a shorts pattern, you can make some fun looks. The ruffle waist looks adorable with so many different tops.
I’ve made so many pairs and keep thinking of new ways to change them up. Maybe you’ll come up with new ideas to share with me!
More Sewing Projects
I have other related posts on my blog. You might want to check them out.
- By the way, I made my flowy blouse in rayon, and it’s great for summer.
- I made some colorful cotton shorts using this same hack.
- And what about some DIY shorts with contrast pockets?
- Trying to find the best waistband elastic to use for a comfy fit? I’ll tell you.
I’d love to hear about your sewing projects!
Originally published: September 12, 2024