
Disclaimer: This post may contain affiliate links. As an Amazon Associate, I earn from qualifying purchases.
When I made my DIY button-up dress, I strived for basic shapes. This one is that, with a flattering skirt and short-sleeved bodice.
Some days, I like to throw on any garment that’s an outfit on its own. No need to match a top or bottom, and you can dress it up or down.
I’ll tell you about the pattern I used, materials, process, and share photos. You might go ahead and make one too.
McCall’s M7920 Dress Pattern

I like McCall’s M7920 sewing pattern because it’s a classic for all seasons. It’s got a simple design.
But, there’s so much to this dress. Of course, it’s a V-neck button-up with a facing.
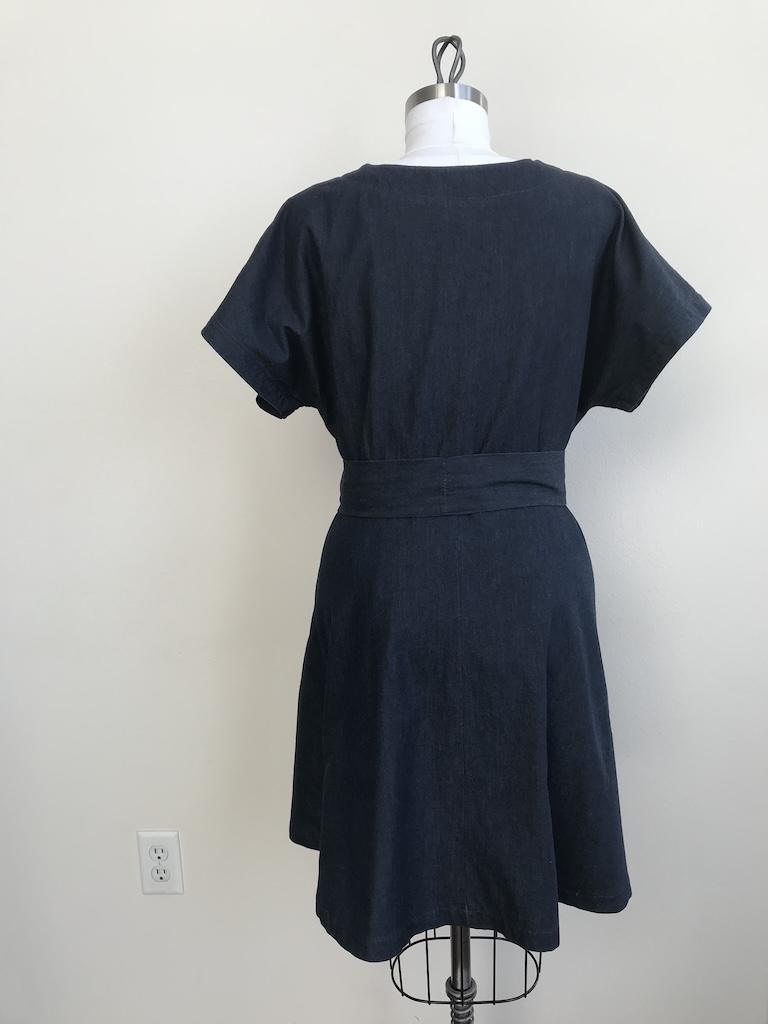
It’s semi-fitted through the bust, and you can add the tie belt for more shape. So, you’ll have some shape with the darts, but it won’t be very tight.
You can make a straight or A-line skirt, with side seam or topstitched pockets. Don’t you love dresses with pockets?
No matter which version you choose, the bodice and skirt have clean lines. It has no frills or ruffles.
The back of the sewing pattern is labeled easy. Beginners would find this one challenging, so I’d rate it as intermediate-level.
Materials
Here’s everything I used for this project. I’m telling you, I had way too much of this fabric lying around.
Fabric

Whenever I’m on the fence about how a pattern might turn out, my default is to make it in chambray. It’s an easy fabric to work with.
Chambry is a lighter-weight denim with a nice drape that I sew with a lot. I found it at Joann in the denim section.
The fabrics suggested for this dress are linen, crepe, denim, and twill.
Notions
You’ll need eight buttons to make the knee-length and longer versions of this dress. The pattern calls for 5/8-inch (0.625-inch) buttons, but I used 1/2-inch (0.5-inch) ones, which is close enough.
I also used lightweight fusible interfacing for the areas that needed some structure.
Needle
I used a size 80/12 universal needle. This chambray was around the same weight as quilting cotton.
Thread

I used a navy blue Gutermann universal thread in my sewing machine. It’s made of 100% polyester.
For the overlocking, I used Maxi-Lock serger spun thread. It’s also made of polyester.
Sewing My Dress
Making this dress was a little more involved than it looks. I followed the directions.
Prepping

When making a new pattern, you should make a mockup. I made mine with muslin fabric, and many times I’ll sew scraps together!
My waist is high, and I have a short torso and long legs. So, I took a look at the waistline.
I decided to raise the waist a little. Otherwise, it’d feel too low.
So, if your natural waist is higher or lower, you can mark it on the muslin like I did. I drew arrows to remind myself to raise the skirt.

I took mine up an inch, which may not seem like a whole lot. But, it makes a big difference.
I typically make the adjustment on my muslin, but this time, I just pinned it and tried it on. I wanted to keep the pattern as is in case I want to make a different adjustment in the future.
If you do adjust the waistline, remember you’ll have to change the buttonhole placement.
You don’t want any buttons to fall on or near any seams. The one you might worry about is where the bodice and skirt join.
Construction

After doing all of the fitting, the dress itself was easy to sew. I made the A-line skirt version a couple of times.
There is a pencil skirt version, but I don’t wear pencil skirts very often. I always have to fuss with the hips.
I started with the bodice, which has some darts for shaping.

With the dolman sleeves, you don’t have to worry about attaching sleeves. The bust and sleeve are all one piece.
Then I worked my way to the skirt. By the way, I’m so glad this skirt has inseam pockets. I attached the skirt to the bodice.

I’ll add that because of the button, you’ll have to sew a facing and sandwich interfacing between. It folds over on the inside to provide stability to sew the buttonholes and buttons.
Before sewing the buttons, I did a buttonhole placement check again. Since I raised the waistline, I had to make sure they didn’t end up on it.
I also made the optional tie belt to go around the waist. I’m glad I did because it’s cute with it.
Adjustments

Don’t let my pattern modifications scare you. Besides raising the waistline, I made a bust adjustment for the bodice.
I basically traced the original sewing pattern. Then I worked on opening up the bust area by slashing it.
You might see my slashes with tape and extra tissue paper around them. Others might do theirs differently.
I like making a pattern and testing it on the muslin. But I could have gotten away with not making one.
There’s enough ease worked into this semi-fitted pattern. But I just wanted to see how it’d fit.
Plus, I’m so much in the habit of making adjustments where I can. It never hurts, and it’s good practice.
Finishing Touches
The last thing I usually like to do is my hems. Many directions will have you finish them as you sew.
But I like to put my dress on the dress form and let it hang. Then I save the skirt bottom and sleeves for last.
It’s just a habit I have, and it’s not necessary to hang your fabric like this unless you’re sewing on the bias.
I like to try on my garment after pinning and pressing the hems to make sure I like them. After I let it sit on the dress form, I make up my mind about the hem width.
Project Notes
I make dresses from time to time and prefer to make skirts. I like to mix and match separates in my closet.
Sometimes, I’ll wear a dress because I don’t have time to mix and match. You can just throw it on with sneakers or dress shoes.
I think the tie belt helps balance it out and shows more of my waistline. An alternative to a tie belt is a wide elastic belt.
If you don’t want a belt, this dress would look wonderful without one too.
Final Thoughts
Overall, I like my dress, even though I don’t wear it too much. It’s fun to throw on when going around town with my sneakers.
I might try this pattern again with a different fabric. For now, I’ll keep it on my good list since it has nice pockets!
More Sewing Projects
I have other related posts you might like on my blog. You can check them out too.
- I made an empire waist button-up dress in soft, flowy tencel.
- What about overdyeing a dress? I did this to cover a stain, but you can do it just for fun.
- I used fabric dye to color another knit dress of mine.
I’d love to hear all about your sewing adventures!
Originally published: January 29, 2025


