Disclaimer: This post may contain affiliate links. As an Amazon Associate, I earn from qualifying purchases.
Did you find a tiny hole in your favorite garment? Well, I’ll show you how to fix a small hole in clothes without sewing.
I recently found a hole in my pants, so this is fitting. My blog is all about sewing, but sometimes I do no-sew fixes too.
You can repair small snags and holes before they grow. I’ll show you what materials I use for this easy fix and how to do it step-by-step with photos.
Materials
You might already have many of these items around the house. These are the things you’ll need.
- Fusible bonding
- Scissors
- Scrap fabric
- Iron & Ironing board
- Pressing cloth: muslin or light woven cotton fabric
Notes on Choosing Scrap Fabric
The scrap fabric will be the “patch.” I try to match it to the clothes. For example, if you’re fixing stretchy fabric, try to find stretchy fabric. If you’re fixing denim, try to find denim or a heavier woven fabric, etc.
Notes on Choosing Fusible Bonding

I use Stitch Witchery or Heat ’n’ Bond. You can use any brand, and I got mine pretty cheap at Walmart.
They’d be listed under fusible bonding web or hemming tape. There are different weights for regular, light, and heavy fabrics.
For a light blouse, you’d use the lightweight bonding. For jeans, you’d use heavyweight bonding. Anything in between can use regular.
Fix a Small Hole in Clothes Tutorial
In a nutshell, we’ll make a small patch on the wrong side of the fabric. This method will only work for a smaller-sized hole.
If you have a big hole, you’ll see the fabric underneath, and it’d be better to sew a patch over it.
1. Find the small hole.

We’ll be working on the inside of the fabric, or the wrong side. So work on the side that people won’t see.

You don’t want to apply the bonding on the outside of the fabric, or the right side of the fabric.
Turn the garment inside out if you need to. I didn’t have to do this to find the hole in my pants.
2. Cut the fusible bonding.

I cut a small piece of the Stitch Witchery. Since we’re working with a small hole, you won’t need too much. The hole I’m working with is the size of a marker tip.
So I cut a piece that was smaller than 1 inch long. It’s enough to cover the hole and hold the scrap fabric in place.
3. Place it on the fabric.

I centered the fusible bonding over the hole. Make sure it’s covering the hole completely.
You may want to pull the hole in the best you can. Meaning, do the opposite of stretching it out.
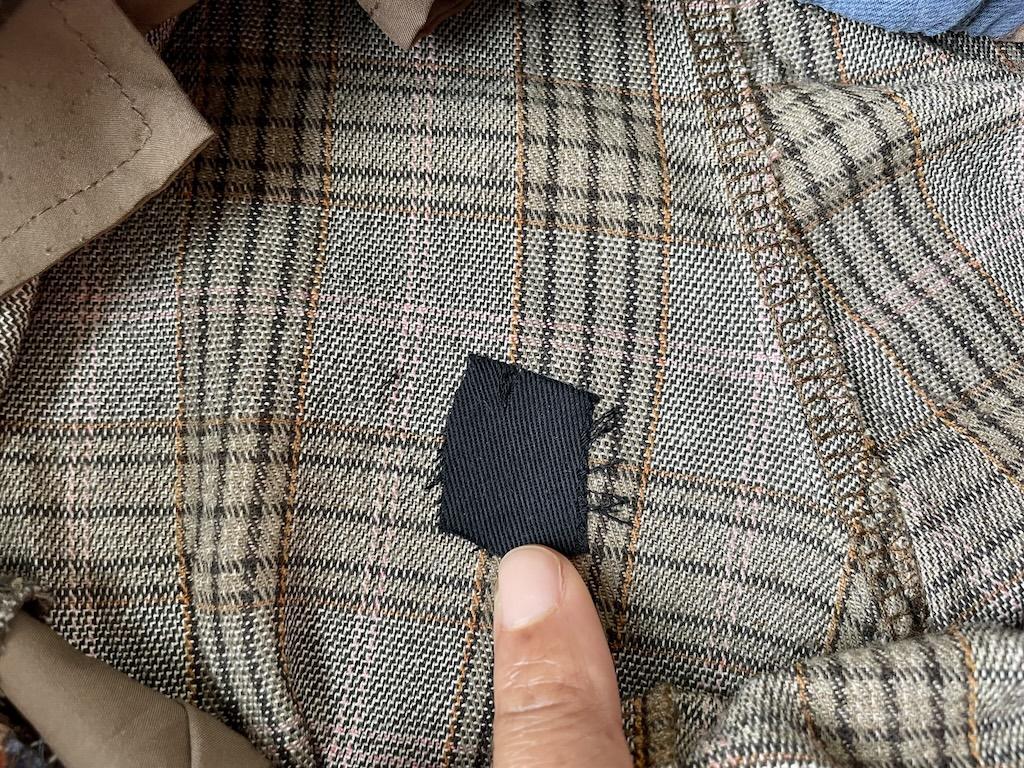
4. Cut the scrap fabric.

I cut a small piece of scrap fabric in Tencel twill. Black will have to do because I didn’t have any brown fabric.
I cut the scrap fabric a little bigger than the fusible bonding.
5. Place it on the bonding.

You’ll want to center the piece of scrap fabric over the fusible bonding. So, the bonding will be sandwiched between the two fabrics.

The bonding needs something to cling to on both sides.
6. Place the pressing cloth.

You’ll want to place your pressing cloth over the layers you created. Make sure you don’t accidentally move anything.
The pressing cloth is so the iron won’t ruin your clothes. Also, you don’t want bonding to get on the iron.
7. Press with the iron.

Now, take your hot iron and press it over the patch. I used a hot setting with steam. (I’ve found the steam helps get the heat in there.)
Make sure the iron is on the pressing cloth, scrap fabric, bonding, and garment all at the same time.
I hold it there for about 20 to 30 seconds. You can also use the iron on the dry setting if you’re working with delicate fabric.
8. Remove the pressing cloth.

Once done pressing, place your iron to the side. Remove the pressing cloth.
You’ll see the scrap fabric patch bonded onto the garment.
9. Let the patch cool.
You might be tempted to pick at the patch to see if it has held up. However, allow it to cool first.
Wait about 2 minutes for the fabric to cool down. Now my patch is bonded to my pants.
10. Check the patch and hole.

Once cooled, you’ll want to make sure the patch is bonded. If it’s peeling off, you can apply more heat and/or more fusible bonding.
You’ll want to examine the hole on the right side of the fabric. Up close, I can tell where it was.

The goal isn’t to make it invisible, and people probably won’t notice. With the adhesive, it won’t grow or rip into a bigger hole.
Notes

If you don’t have fabric to use for your patch, you can order swatches from fabric stores for a couple of dollars. And you might be able to match the type, color, and weight to your garment.
You can always run a test on some scrap fabric to see how this method works. Since I’ve done this many times, I know what to expect.
If you use fusible bonding that’s too heavy for your fabric, it could bleed through. I’d stick with lighter bonding for blouses and other similar clothes.
Once you have patched the hole, you can wear the clothes as usual. My pants can be washed and worn. Yes, the fusible bonding will hold up in the wash.
I usually wash handmade clothes on a delicate cycle and hang them to dry. Dryer heat may cause fusible bonding to peel or come loose. If it does, you can always use the iron to press it back in place.
Overall
Now that you know how to fix a small hole in clothes, you can mend away. It’s a great hack whether you sew or not.
And a little bit of fusible bonding goes a long way. I’ve had mine in my stash for several years, and it sure has come in handy!
Read More
- What about making a mini travel sewing kit for quick fixes on the go?
- Would you like to learn how to sew a button by hand? I’ll show you!
- I’ll tell you where to learn to sew, and even some places with free classes.
Originally published: June 4, 2025